
How to Install Google Analytics Tracking Code on Your Website [Quick Tip]
The most popular? Google Analytics. It's easy to use if you're willing to roll up your sleeves a bit, and provides a wealth of data on the people coming to your website. With just a few easy steps that I'll outline in this post, you can get you up and running with this powerful tool in no time.
First Things First: Make Sure You Can Edit Your Website
Before opening up this proverbial can of worms, please do yourself a favor and make sure you have access to make edits to your website through a content management system (CMS). If not, you’ll need to work with someone else, probably a web developer or someone in IT, who can install the tracking code for you.
Access Your Google Analytics Tracking Code
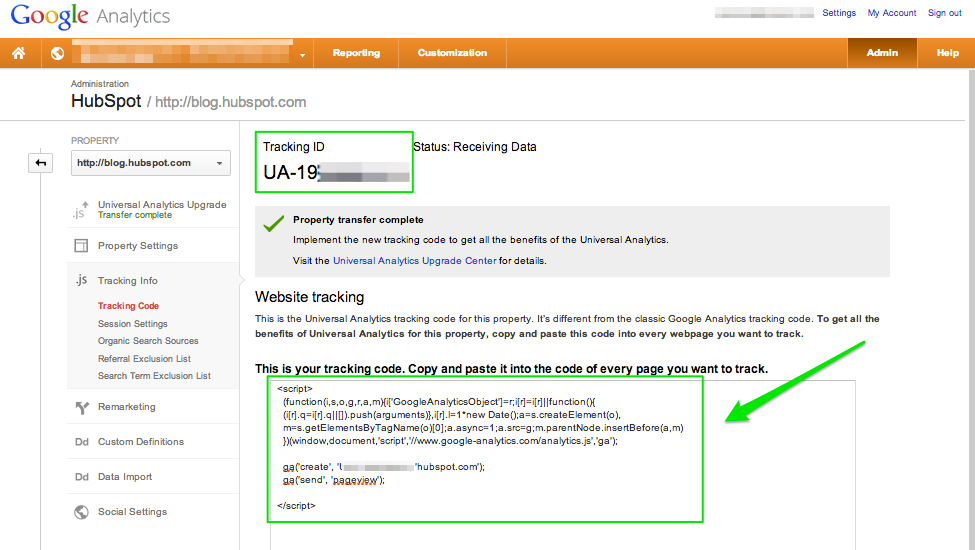
Once you’re sure you will be able to make edits to your website, we can move on to securing the appropriate Google Analytics tracking code. Log into your Google Analytics account and click ‘Admin’ in the upper right hand side of the page. Select the appropriate Account and Property, then click ‘Tracking Info’ in the middle column labeled ‘Property’. Click ‘Tracking Code’ under ‘Tracking Info’ to access the website tracking code you’ll need to install on your website. On this page, you’ll see a box with multiple lines of code. Be sure to copy the entire tracking code, beginning with <script> all the way through to </script>.

Add Tracking Code in the Right Place
With your tracking code in hand, you’re ready to install!
Log into your CMS and access your site’s HTML code. The script must be placed at the top of your website page, immediately before the </head> tag that appears on each page you want to track. As I mentioned earlier, some CMSs, including HubSpot, have a separate section where you can easily add either your tracking code or tracking ID. Make sure you look into your CMSs setup to ensure proper installation.
The most popular? Google Analytics. It's easy to use if you're willing to roll up your sleeves a bit, and provides a wealth of data on the people coming to your website. With just a few easy steps that I'll outline in this post, you can get you up and running with this powerful tool in no time.
First Things First: Make Sure You Can Edit Your Website
Before opening up this proverbial can of worms, please do yourself a favor and make sure you have access to make edits to your website through a content management system (CMS). If not, you’ll need to work with someone else, probably a web developer or someone in IT, who can install the tracking code for you.
Access Your Google Analytics Tracking Code
Once you’re sure you will be able to make edits to your website, we can move on to securing the appropriate Google Analytics tracking code. Log into your Google Analytics account and click ‘Admin’ in the upper right hand side of the page. Select the appropriate Account and Property, then click ‘Tracking Info’ in the middle column labeled ‘Property’. Click ‘Tracking Code’ under ‘Tracking Info’ to access the website tracking code you’ll need to install on your website. On this page, you’ll see a box with multiple lines of code. Be sure to copy the entire tracking code, beginning with <script> all the way through to </script>.
Add Tracking Code in the Right Place
With your tracking code in hand, you’re ready to install!
Log into your CMS and access your site’s HTML code. The script must be placed at the top of your website page, immediately before the </head> tag that appears on each page you want to track. As I mentioned earlier, some CMSs, including HubSpot, have a separate section where you can easily add either your tracking code or tracking ID. Make sure you look into your CMSs setup to ensure proper installation.